Hessian RPC调用例子

Hessian是一个轻量级的RPC框架,它可以以WEB接口的形式提供RPC服务,因为Hessian是一个二进制协议,所以特别适合用来传送二进制数据。下面就用一个简单的例子来演示一下怎么使用Hessian。

首先创建一个Spring Boot Web工程,这个通过Spring Initializer页面就可以创建了,Dependencies里面选上Web就行了。

用Eclipse导入这个工程,然后新建一个简单的domain对象User,我们的客户端和服务端就通过这个类来交互数据

1
2
3
4
5
6
7
8
9
10
11
12
13
14
15
public class User implements Serializable {	
private static final long serialVersionUID = -3272769708611790992L;
private String name;
private String job;

public User(String name, String job) {
this.name = name;
this.job = job;
}

public String toString() {
return "name = " + this.name + ", job = " + this.job;
}

}

要注意因为要通过网络传送User类的数据,所以User类一定要实现Serializable接口。
然后建立一个简单的接口UserAPI,服务端负责实现这个方法,而客户端则通过RPC调用这个方法。

1
2
3
public interface UserAPI {
User getUser();
}

接下来是UserService,这个负责实现具体的getUser,继承HessianServlet是因为Hessian是通过Servlet来提供Http服务的。

1
2
3
4
5
6
@WebServlet(urlPatterns = "/userservice")
public class UserService extends HessianServlet implements UserAPI {
@Override public User getUser() {
return new User("Zhou", "Programmer");
}
}

为了让Spring Boot注册Servlet,还需要给HessianServerApplication加一个@ServletComponentScan的注解

1
2
3
4
5
6
7
8
@ServletComponentScan
@SpringBootApplication
public class HessianServerApplication {

public static void main(String[] args) {
SpringApplication.run(HessianServerApplication.class, args);
}
}

然后通过Run as Java Application启动这个简单的Spring Boot程序,然后用浏览器访问http://127.0.0.1:8080/userservice,可以看到一行提示“Hessian Requires POST”,说明服务已经启动成功了,接下来需要编写客户端代码,来验证RPC能力了。这里为了方便共用User和UserAPI,我把客户端代码和服务端代码直接放在了同一个工程里面,正常情况下,应该是把User和UserAPI封装到一个独立的jar包里面,客户端和服务端都引用这个jar包即可。
客户端代码很简单,就是先生成一个HessianProxyFactory,然后通过这个工厂创建RPC调用的代理,然后就可以像调用本地对象一样调用远程的方法了,运行之后,输出了

User: name = Zhou, job = Programmer

客户端代码如下

1
2
3
4
5
6
7
8
9
10
11
public class HessianClient {
public static void main(String[] args) throws MalformedURLException {
String url = "http://127.0.0.1:8080/userservice";

HessianProxyFactory factory = new HessianProxyFactory();
UserAPI service = (UserAPI) factory.create(UserAPI.class, url);

System.out.println("User: " + service.getUser());
}

}

工程的整体结构如下图

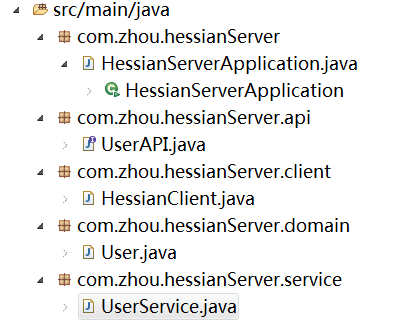
最后,关于Service继承HessianServlet还要多说几句,这是因为Spring Boot不支持web.xml,如果是其他架构,可以支持写web.xml的,可以直接使用HessianServlet,而把自己写的Service作为一个参数传给它,这样Service就不需要继承HessianServlet了,如下所示

1
2
3
4
5
6
7
8
9
10
11
12
<servlet>  
<servlet-name>HessianServlet</servlet-name>
<servlet-class>com.caucho.hessian.server.HessianServlet</servlet-class>
<init-param>
<param-name>service-class</param-name>
<param-value>com.zhou.hessianServer.service.UserService</param-value>
</init-param>
</servlet>
<servlet-mapping>
<servlet-name>HessianServlet</servlet-name>
<url-pattern>/userservice</url-pattern>
</servlet-mapping>

Eclipse Collections简介

最近使用了一下Eclipse Collections,感觉比Java 8自带的集合操作方便了很多,但是感觉EC并不像Apache Commons Collections或者Google的Guava那么流行,所以写一篇博客,给没用过的人简介一下这个框架。

1、历史

Eclipse Collections最早是由高盛(Goldman Sachs)公司开发的,所以一开始叫GS Collections,在2012年开源,后来捐赠给Eclipse基金会,在2015年改名为Eclipse Collections。

2、简介

Eclipse Collections的设计目标是提供一整套集合管理工具,因此,除了对Java集合框架(Java Collections Framework)的List, Map, Set三大数据结构进行了增强,还引入了Bag, BiMap, MultiMap等数据结构。即使没有Bag, MultiMap这些,光是Eclipse Collections引入的那些操作集合的方法就值得一用,下面我们就用一些Java集合框架和Eclipse Collections对比的例子来看一看。

2.1、去除样板代码(Boilerplate Code)

在Java中,你不能直接对集合做map,filter之类的操作,必须先把集合转成stream,然后对stream做操作,最后再把结果转成你需要的形式,而Eclipse Collections就不需要这样,不管你的数据来源是java的List/Set/Map,还是Eclipse Collections自己的MutableList/MutableSet/MutableMap,都可以只聚焦在业务操作上,而不用关心集合和stream之间的转换

1
2
3
4
5
6
7
8
9
10
11
12
List<Person> list1 = Arrays.asList(new Person("Mary", 20), new Person("Jack", 15), new Person("Tom", 25));
List<Person> filter1 = list1.stream(). //boilerplate code
filter(person -> person.getAge() > 18).
collect(Collectors.toList());//boilerplate code
Assert.assertEquals(2, filter1.size());

MutableList<Person> list2 = Lists.mutable.of(new Person("Mary", 20), new Person("Jack", 15), new Person("Tom", 25));
MutableList<Person> filter2 = list2.select(person -> person.getAge() > 18);
Assert.assertEquals(2, filter2.size());

MutableList<Person> filter3 = ListIterate.select(list1, person -> person.getAge() > 18);
Assert.assertEquals(2, filter3.size());

可以看到,使用了Eclipse Collections之后,stream和collect方法都可以省略了。
还有一种常见的样板代码是存在于业务逻辑中的,那就是做统计的时候,比如统计一段文本中,每个单词出现的个数,生成一个Map结构,或者是有一些对象,要按其中的某些属性分组,生成一个Map<K, List>结构,不管是那种情况,都要考虑当K不存在时,插入KV,而key存在时,更新V。

1
2
3
4
5
6
7
8
9
10
11
12
13
14
15
16
17
18
19
20
21
String str = "This is a test, Blah Blah Blah, it is so crazy";
String[] arr = str.split("[ ,]+");
//old style
Map<String, Integer> countMap1 = new HashMap<>();
for (String word : arr) {
int count = countMap1.getOrDefault(word, 0);
count++;
countMap1.put(word, count);
}
Assert.assertEquals(3, countMap1.get("Blah").intValue());
Assert.assertEquals(2, countMap1.get("is").intValue());

//java8 stream & Collectors
Map<String, Long> countMap2 = Arrays.stream(arr).collect(Collectors.groupingBy(w -> w, Collectors.counting()));
Assert.assertEquals(3, countMap2.get("Blah").intValue());
Assert.assertEquals(2, countMap2.get("is").intValue());

//Bag
final MutableBag<String> countBag = Lists.mutable.of(arr).toBag();
Assert.assertEquals(3, countBag.occurrencesOf("Blah"));
Assert.assertEquals(2, countBag.occurrencesOf("is"));

这里Eclipse Collections引入了Bag这种数据结构,Bag相当于一个带有统计每个元素出现次数功能的List,它不仅可以查询元素出现的次数,还可以查询出现次数最多的n个元素(topOccurrences方法)。

2.2、更好的API

Eclipse Collections提供了比Java集合框架更多的API,比如Java的stream有filter方法,如果你想选择年龄大于18的人和年龄小于等于18的人,那就要写两个不同的条件,但是Eclipse Collections就有select/reject两个方法,让你可以用一个条件来筛选,这样可以复用函数表达式,对性能也是有好处的。下面是一些对比代码

1
2
3
4
5
6
7
8
9
10
11
12
13
14
//java style
List<Person> filter1 = people.stream().filter(person -> person.getAge() > 18).collect(Collectors.toList());
List<Person> filter2 = people.stream().filter(person -> person.getAge() <= 18).collect(Collectors.toList());
Map<Boolean, List<Person>> partition1 = people.stream()
.collect(Collectors.partitioningBy(person -> person.getAge() >=18));
List<Person> adults1 = partition1.get(Boolean.TRUE);
List<Person> children1 = partition1.get(Boolean.FALSE);

//EC style
MutableList<Person> filter3 = people.select(person -> person.getAge() > 18);
MutableList<Person> filter4 = people.reject(person -> person.getAge() > 18);
PartitionMutableList<Person> partition2 = people.partition(person -> person.getAge() > 18);
MutableList<Person> adults2 = partition2.getSelected();
MutableList<Person> children2 = partition2.getRejected();

可以看到,用了Eclipse Collections的代码不仅代码量更少,而且函数名含义也更明确了。

2.3、更好的性能

这部分我并没有实测,可以参考infoQ上这篇文章 中的”内存使用比较”和”JMH 基准测试结果”部分

xml的默认命名空间

最普通的xml是没有命名空间的,这时候用xpath解析,直接使用节点的nodename就可以了,比如如下的xml

1
2
3
4
5
6
7
8
9
10
11
12
13
14
15
<?xml version="1.0" encoding="UTF-8"?>
<books>
<book>
<title>book1</title>
<author>zhangsan</author>
</book>
<book>
<title>book2</title>
<author>wanger</author>
</book>
<book>
<title>book3</title>
<author>zhangsan</author>
</book>
</books>

用DOM4j+xpath来解析是很简单的,比如我们想搜索所有作者是zhangsan的书示例代码如下

1
2
3
4
5
6
7
8
9
10
11
//代码1
Document document = DocumentHelper.parseText(str);
//方法1
List<Node> list = document.selectNodes("//book/author[text()=\"zhangsan\"]");
//方法2
XPath x = document.createXPath("//book/author[text()=\"zhangsan\"]");
List<Node> list = x.selectNodes(document);

for (Node node : list) {
System.out.println(((List<Node>)node.getParent().elements("title")).get(0).getText());
}

不论使用方法1还是方法2,最后打印出来的结果都是

book1
book3

如果books节点上声明了namespace,并且子节点也都使用了对应的prefix,那也是很容易处理的,修改后的xml如下

1
2
3
4
5
6
7
8
9
10
11
12
13
14
15
<?xml version="1.0" encoding="UTF-8"?>
<books xmlns="http://www.springframework.org/schema/beans" xmlns:xsi="http://www.w3.org/2001/XMLSchema-instance">
<xsi:book>
<xsi:title>book1</xsi:title>
<xsi:author>zhangsan</xsi:author>
</xsi:book>
<xsi:book>
<xsi:title>book2</xsi:title>
<xsi:author>wanger</xsi:author>
</xsi:book>
<xsi:book>
<xsi:title>book3</xsi:title>
<xsi:author>zhangsan</xsi:author>
</xsi:book>
</books>

这时候只要对上面的xpath稍作修改,在nodename前加上指定的prefix就可以实现同样的效果,示例代码如下

1
2
3
4
5
6
7
8
//代码2
Document document = DocumentHelper.parseText(str);
//方法1
List<Node> list = document.selectNodes("//xsi:book/xsi:author[text()=\"zhangsan\"]");

//方法2
XPath x = document.createXPath("//xsi:book/xsi:author[text()=\"zhangsan\"]");
List<Node> list = x.selectNodes(document);

但是如果books节点上声明了namespace,但是子节点并没有使用对应的prefix,那处理起来就有点麻烦了,示例的xml如下

1
2
3
4
5
6
7
8
9
10
11
12
13
14
15
<?xml version="1.0" encoding="UTF-8"?>
<books xmlns="http://www.springframework.org/schema/beans" xmlns:xsi="http://www.w3.org/2001/XMLSchema-instance" >
<book>
<title>book1</title>
<author>zhangsan</author>
</book>
<book>
<title>book2</title>
<author>wanger</author>
</book>
<book>
<title>book3</title>
<author>zhangsan</author>
</book>
</books>

这时候,像代码1那样使用不带namespace的xpath,是搜索不到结果的,如果想使用代码2,又不知道该如何指定namespace。这种情况,就需要用到默认namespace了,有两种方法可以设置默认的namespace,这两种方法都需要一个Map类型的对象,用于存储namesapce的URI和默认的prefix的对应关系

1
2
3
4
5
6
7
8
9
10
11
12
13
//代码3
Map<String, String> nsContext = new HashMap<String, String>();
nsContext.put("p", "http://www.springframework.org/schema/beans");
//方法1
DocumentFactory.getInstance().setXPathNamespaceURIs(nsContext);
Document document = DocumentHelper.parseText(str);
List<Node> list = document.selectNodes("//p:book/p:author[text()=\"zhangsan\"]");

//方法2
Document document = DocumentHelper.parseText(str);
XPath x = document.createXPath("//p:book/p:author[text()=\"zhangsan\"]");
x.setNamespaceURIs(nsContext);
List<Node> list = x.selectNodes(document);

再运行代码,又可以获得跟代码1和代码2同样的效果了。

解决修改pom.xml导致IDEA设置改变的问题

前一阵子用Intellij IDEA导入了一个maven项目,本来已经设置好了如下的两个配置项

Settings->Compiler->Java Compiler->Target Bytecode Version为1.8
Project Settings->Modules->Source->Language Level为8

一开始用的好好的,但是如果修改了pom.xml之后,就会出现类似”Lambda expressions not supported at this language level”这样的提示,这时再去看上面说的两个设置,发现都变成了1.7,手动改回1.8之后,如果再修改pom.xml,还会出现同样的问题。

后来上网搜索了一下,发现这是因为IDEA的这两个设置会跟随pom.xml里面的设置改变,但是我的pom.xml里面并没有对应的内容,又搜索了一下Maven如何设置Java版本号,找到了Maven官方提供的解决方案,根据这个文档,增加了如下的设置,再修改pom.xml,发现两个设置项都不再变化了。

<properties>
    <maven.compiler.source>1.8</maven.compiler.source>
    <maven.compiler.target>1.8</maven.compiler.target>  
</properties>

但是最近又用IDEA打开了一个Spring Boot项目,pom.xml里默认已经设置了

<properties>
      <project.build.sourceEncoding>UTF-8</project.build.sourceEncoding>
      <project.reporting.outputEncoding>UTF-8</project.reporting.outputEncoding>
      <java.version>1.8</java.version>
  </properties>

可是还是会有修改了pom.xml之后,IDEA设置改变的问题,而且Spring Boot的pom.xml没有使用maven-compiler-plugin,默认只有一个spring-boot-maven-plugin,最后还是照搬了上面那个文档的方案,直接给pom.xml增加了一个maven-compiler-plugin

<project>
  [...]
  <build>
    [...]
    <plugins>
      <plugin>
        <groupId>org.apache.maven.plugins</groupId>
        <artifactId>maven-compiler-plugin</artifactId>
        <version>3.8.0</version>
        <configuration>
          <source>1.8</source>
          <target>1.8</target>
        </configuration>
      </plugin>
    </plugins>
    [...]
  </build>
  [...]
</project>

增加了这个maven-compiler-plugin之后,再修改pom.xml,IDEA的设置终于可以不再自动变化了。

以后用这个记录博客了

刚装上Hexo,还不是很会用,好像是通过Markdown来生成静态网页的,那还需要一个本地的Markdown编辑器了。

简单设置

_config.yml里面的title和subtitle可以设置博客的标题和副标题。
使用hexo new name来创建名为name的文章
如果修改了旧文章,使用hexo clean清理已生成的内容,然后hexo g重新生成内容
hexo deploy部署文件到远程服务器